
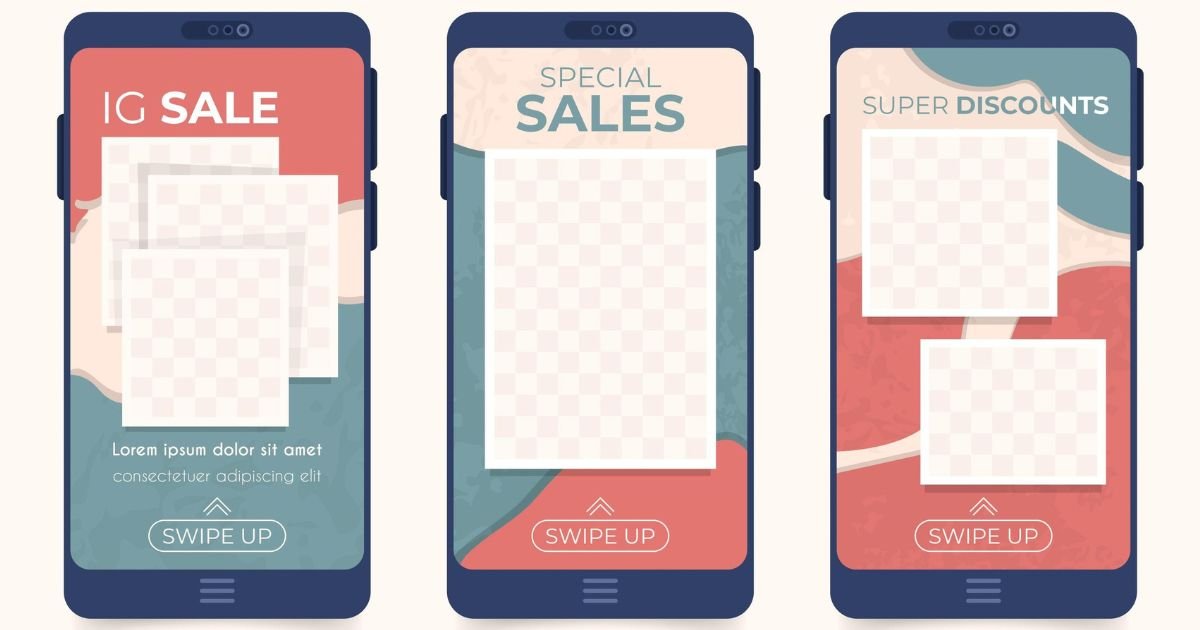
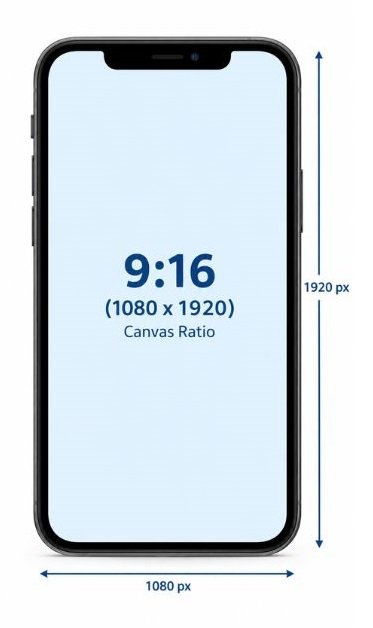
You spend an hour on a Story, hit publish, and your logo is sitting under the profile bar. Or the photo looks soft. Or two black bars frame a video that was supposed to fill the screen. Each problem has the same root cause: the file didn’t match what Instagram expects. The right Instagram Story Dimensions are 1080 x 1920 pixels at a 9:16 aspect ratio, and every other decision in this guide builds on that number.
Size is only half the job, though. Instagram also covers the top and bottom of every Story with its own interface, and that’s where most text, logos, and call-to-action buttons go to die.
This guide gives you the exact specs for images and videos, the safe zone measurements, a clear method for fitting photos that aren’t vertical, and a detailed look at eight tools you can use to build Stories at the right size. You’ll also get an export checklist, a list of the most common mistakes, and ten answers to the questions people type into Google most often.
What Is the Best Size for an Instagram Story in 2026?
The best size for an Instagram Story is 1080 x 1920 pixels with a 9:16 aspect ratio. This fills a full phone screen with no cropping or black bars. Images can be up to 30 MB in JPG or PNG, and videos can be up to 4 GB in MP4 or MOV.
Those figures line up across current guides, including a January 2026 breakdown from The Brief (formerly Creatopy), which lists 30 MB as the image limit and 4 GB as the video limit. Instagram will accept other sizes. It just won’t display them well.
Resolution and aspect ratio
Think of the Story as a tall rectangle. A 9:16 ratio means for every 9 units of width you get 16 units of height. At 1080 pixels wide, that gives you 1920 pixels of height.
You can go lower. Moda’s published spec lists a minimum of 600 x 1067 pixels. But anything below 1080 x 1920 gets scaled up on modern phone screens, and scaling softens text first. Start at full size and you never have to think about it again.
File size, format, and length limits
Stories have different limits for photos and videos, so here they are side by side.
| Spec | Image Story | Video Story |
|---|---|---|
| Recommended size | 1080 x 1920 px | 1080 x 1920 px |
| Aspect ratio | 9:16 | 9:16 |
| Accepted formats | JPG, PNG | MP4, MOV |
| Maximum file size | 30 MB | 4 GB |
| Display time | 5 seconds | Up to 60 seconds per clip |
| Recommended codec | Not applicable | H.264 video, AAC audio |
| Color mode | sRGB | sRGB |
| Frame rate | Not applicable | 30 fps is a safe default |
Longer videos are generally split into 60-second segments when you upload them, so a two-minute clip becomes two Stories. That can break a sentence in half, which is why you should trim to 60 seconds before you upload instead of letting Instagram decide where the cut falls.
A quick note on color. Export everything in sRGB. Wide-gamut colors from some cameras and design apps look flat or shifted once Instagram compresses them.
These ig story dimensions apply to organic Stories and Story ads alike, though ads add a few placement rules of their own, which we’ll cover in the FAQ.
The recommended Instagram Story size is 1080 x 1920 pixels at a 9:16 aspect ratio. Images accept JPG and PNG up to 30 MB, while videos accept MP4 and MOV up to 4 GB and run up to 60 seconds per clip. Anything that isn’t 9:16 gets padded or cropped by Instagram.
What Is the Instagram Story Safe Zone and Why Does It Matter?
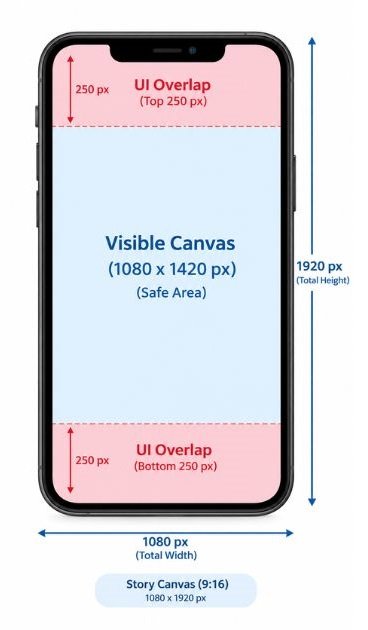
The Instagram Story safe zone is the middle part of the screen that Instagram’s interface never covers. A common rule is to keep text, logos, and buttons at least 250 pixels away from the top and bottom edges, which leaves a safe area of roughly 1080 x 1420 pixels.
Honestly, this is the part most people skip. And it shows.
What sits in the top and bottom zones
At the top, Instagram places the progress bar, your profile photo, your username, and the menu. At the bottom, it places the “Send message” reply field and the reaction icons. If you add a link sticker, its preview also lands in the lower zone.
Different sources measure this differently. The Brief and several other 2026 guides recommend the 250-pixel buffer. Sprout Social’s and Hootsuite’s published guides use a tighter figure, closer to 155 pixels at each end, which gives a 1080 x 1610 safe area. Instagram updates its interface from time to time, so no figure is permanent.
My advice? Use 250 pixels. If the real overlay turns out smaller, you lose a little empty space. If you trust the smaller figure and it’s wrong, you lose your headline.
- Keep top and bottom margins of at least 250 px for anything important
- Keep side margins of around 60 px so text doesn’t touch the screen edge
- Let backgrounds and photos run to the full canvas, since only text and logos need protection
- Leave room for the link sticker if the Story needs a link
Why Reels need a bigger bottom margin
Stories and Reels share the same 1080 x 1920 frame, but Reels carry a caption, an audio label, and a row of action buttons. ScreenSnap Pro’s April 2026 guide puts the Reels bottom reserve at about 410 pixels. If you reuse a Story as a Reel, check the bottom third before you post.
Keep text and logos at least 250 pixels away from the top and bottom of a 1080 x 1920 Story. That leaves a safe area of about 1080 x 1420 pixels where Instagram’s profile bar, reply field, and link sticker preview can’t cover your message. Reels need a deeper bottom margin, around 410 pixels, because of the caption and audio label.
How Do You Size Photos for Stories?
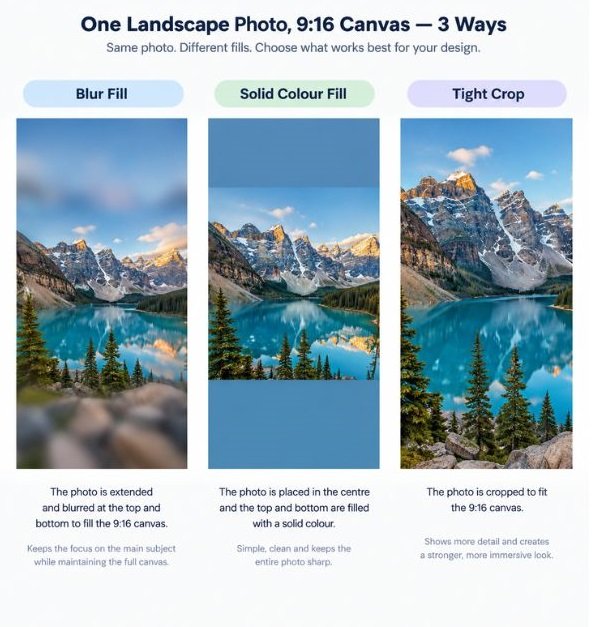
Export photos at 1080 x 1920 pixels as JPG or PNG. If your original isn’t 9:16, either crop it to fill the frame or place it on a 1080 x 1920 canvas with a background colour, blur, or gradient behind it. Never stretch a photo to fit.
Start with the maths, because it explains why non-vertical photos feel awkward.
Portrait, square, and landscape photos in a 9:16 frame
A 4:5 feed photo at 1080 x 1350 leaves 570 empty pixels on a Story canvas. A square 1080 x 1080 image leaves 840. A standard landscape photo at 1920 x 1080, scaled to fit the width, becomes about 607 pixels tall and leaves more than 1,300 pixels empty. That’s two-thirds of the screen.
So you have two choices. Crop tightly into the subject so the photo fills the screen, or build a layout that uses the empty space on purpose, with a headline above and a caption below. Both beat a floating thumbnail with a grey gap.
Backgrounds, blur fills, and cropping rules
Blur fills work well for travel and lifestyle shots. Solid brand colours work better for product shots, because they keep the focus on the item. Gradients suit announcements.
One rule on cropping: crop before you upload, in a tool where you can see the result. Instagram’s own auto-fit decides for you, and it doesn’t know where your subject’s face is.
How Do You Size Videos for Stories?
Record or export videos at 1080 x 1920 pixels in MP4 or MOV, using H.264 video and AAC audio at 30 frames per second. Keep each clip to 60 seconds or less. Shoot vertically from the start, because rotating a horizontal clip later forces a heavy crop.
Frame rate, bitrate, codecs, and audio
H.264 is the safe codec. Almost every phone and editor supports it, and Instagram handles it without surprises. AAC is the matching audio format.
On bitrate, some guides suggest targeting about 3,500 kbps for 1080p. Higher bitrates keep more detail in your source, but Instagram re-compresses every upload anyway, so there’s a point where extra data stops helping. A clean, well-lit source with minimal grain survives compression far better than a noisy one at any bitrate.
Audio matters more than people think. Many viewers watch with sound off, so add captions, but don’t skip a clean audio track for those who don’t.
Reels vs Stories vs Feed video sizes
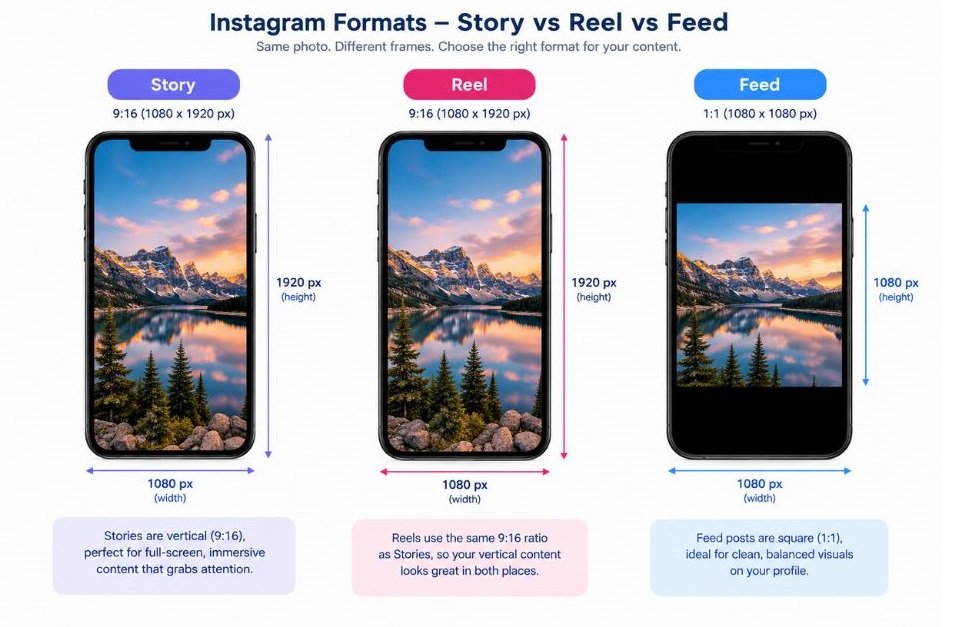
Reels use the same 1080 x 1920 frame as Stories. The difference is length, the interface, and distribution. Feed videos can be vertical too, usually at 4:5 or 1:1, but they don’t fill the screen.
| Format | Size (px) | Ratio | Length | Bottom safe margin |
|---|---|---|---|---|
| Story | 1080 x 1920 | 9:16 | Up to 60 sec per clip | About 250 px |
| Reel | 1080 x 1920 | 9:16 | Longer, check Instagram’s current limit | About 410 px |
| Feed portrait | 1080 x 1350 | 4:5 | Varies | Not applicable |
| Feed square | 1080 x 1080 | 1:1 | Varies | Not applicable |
Reel length limits have changed more than once, so confirm the current figure inside Instagram before you plan a long edit.
Which Tools Help You Create Stories at the Right Size?
Eight tools cover almost every Story workflow: Instagram’s own editor, Canva, Adobe Express, CapCut, InShot, Photoshop with Premiere Pro, Figma, and Instagram’s Edits app. Each one can hit the right ig story dimensions. They differ in speed, cost, and how much control you get.
Pick by the job, not the brand. A quick poll needs a different tool than a branded product launch.
Instagram’s built-in camera and editor
The native editor is the fastest way to post. You open Instagram, tap the plus icon, choose Story, and either shoot or pick a file from your gallery. It adds text, stickers, music, polls, questions, link stickers, and drawing tools.
The editor also warns you when a sticker crosses into the UI zone, which makes it a useful safety net. It’s the one tool where the safe zone is checked for you.
Its limits are real, though. Typography choices are narrow, there’s no template system, and layout control is basic. A non-9:16 photo gets placed inside the frame with a background behind it, and you decide the final crop by pinching and dragging. It works for casual posts and reactions. For anything branded, design elsewhere and finish here.
Best for: same-day Stories, polls, behind-the-scenes clips. Cost: free.
Canva
Canva is the most popular choice for non-designers. Go to Create a design, search for Instagram Story, and Canva opens a canvas already set to 1080 x 1920 pixels. Thousands of templates sit on the same canvas.
Here’s the workflow. Pick a template or start blank, then add your photo or video. Drag text into place and use Canva’s rulers or guides to hold a 250-pixel margin at the top and bottom. When you finish, use Share, then Download, and choose PNG or JPG for images and MP4 for videos.
Canva also lets you resize an existing design into the Story format, though that feature sits on the paid plan. Brand kits, scheduling, and shared folders matter if a team posts Stories, because they keep fonts and colours consistent without anyone asking.
The trade-off: popular templates make everyone’s Stories look alike. Change the fonts, colours, and layout until it feels like your brand.
Best for: small teams, creators, and brands that post daily. Cost: free plan with paid upgrades.
Adobe Express
Adobe Express sits between Canva and Photoshop. It offers a Story preset, templates, a background remover, and animation effects, and it syncs with Adobe’s other apps. If your team already uses Creative Cloud, you can pull logos and brand assets straight in.
Start from the Instagram Story preset, add your content, and use the quick animation tools to give text and images motion without building a video timeline. Export as PNG, JPG, or MP4.
Adobe Express also has a resize feature that converts one design into several formats at once, which helps when you need the same campaign as a Story, a feed post, and a Reel cover. Some of its advanced functions need a paid plan, so check what your plan includes first.
Best for: Adobe users who want speed without a steep learning curve. Cost: free tier plus paid plans.
CapCut
CapCut is a video editor known for templates, captions, and effects. For Stories, you create a new project, set the ratio to 9:16, and export at 1080p. It handles auto-captions, background removal, speed ramps, and trending effects well.
A warning for readers in India: CapCut has been blocked in India since 2020, so you may not be able to install or use it here. If you’re in India, skip to InShot or Instagram’s Edits app, which cover the same ground. Readers elsewhere should check regional availability, because app access changes.
Where it’s available, CapCut shines for fast, trend-led video. Its free version adds watermarks to some templates, so check your export before posting.
Best for: short, effect-heavy videos where available. Cost: free with paid upgrades.
InShot
InShot is a mobile editor that’s friendly for beginners. Open a new project, tap Canvas, and choose 9:16. If your clip is horizontal, InShot lets you fill the empty space with a blurred copy of the video, a colour, or an image.
That fill feature is why people use it. A 16:9 clip placed on a 9:16 canvas leaves large gaps, and InShot fills them in two taps. Add text, stickers, music, and speed changes, then export. The free version adds a watermark, which you can remove through a paid plan or by watching an ad, depending on the version.
Check the export resolution before you save. Pick 1080p so the file isn’t downscaled.
Best for: quick mobile edits and repurposing horizontal footage. Cost: free with a paid upgrade.
Adobe Photoshop and Premiere Pro
These are the professional tools. Photoshop handles still images, Premiere Pro handles video, and together they give you full control over size, colour, and compression.
In Photoshop, go to File, then New, and set 1080 x 1920 pixels at 72 pixels per inch in sRGB. Add guides at 250 pixels from the top and bottom, so the safe zone is visible as you work. Export through Export As and choose JPG or PNG.
In Premiere Pro, create a sequence with a frame width of 1080 and a height of 1920. Place your clips, add text inside your guides, then go to Export. Choose H.264, set the resolution to 1080 x 1920, pick a frame rate matching your footage, and use variable bitrate encoding with a sensible target.
This route takes the longest and costs the most. It’s worth it for campaigns, ads, and branded series where every pixel is checked.
Best for: agencies, in-house design teams, and paid creative. Cost: Adobe subscription.
Figma
Figma is a design tool, so it’s good for layouts and Story templates your whole team shares. Press F for the frame tool and pick a social media preset for Instagram Story, or type 1080 and 1920 into the size fields yourself.
Figma shines when several people build Stories from one system. Create a master frame with guides at the safe margins, build components for headlines, buttons, and sticker areas, and let teammates duplicate it. Export frames as PNG or JPG using the export panel at 1x scale.
One limit: Figma isn’t a video editor. For animated Stories, design the frames in Figma, then bring them into a video tool.
Best for: product teams and design systems. Cost: free plan with paid team plans.
Instagram’s Edits app
Edits is Instagram’s standalone video editor, launched in spring 2025. You log in with your Instagram account, and it offers a multi-track timeline, AI-powered cutouts and animation, green screen, captions, audio clean-up, and in-app recording of clips up to 10 minutes.
For Story creators, the draw is that it exports without a watermark and publishes directly to Instagram. Reports differ on maximum export quality, with some sources listing up to 4K, so check the export menu in your version. Instagram has also said some advanced AI features may eventually cost money, so treat “free” as current, not guaranteed.
It’s newer than CapCut and has fewer templates. As a free, watermark-free editor made by the platform itself, it’s an easy first choice, especially for readers who can’t use CapCut.
Best for: video Stories made on your phone. Cost: free for now.
| Tool | Platform | Cost | Best for |
|---|---|---|---|
| Instagram editor | Mobile | Free | Quick, same-day posts |
| Canva | Web, mobile | Free and paid | Templates and team branding |
| Adobe Express | Web, mobile | Free and paid | Fast animated graphics |
| CapCut | Mobile, desktop | Free and paid | Trend-led video (check availability) |
| InShot | Mobile | Free and paid | Fitting horizontal clips |
| Photoshop and Premiere Pro | Desktop | Paid | Professional and ad creative |
| Figma | Web, desktop | Free and paid | Shared design systems |
| Edits | Mobile | Free for now | Video Stories, no watermark |
Eight tools cover most Story workflows. Instagram’s editor and Edits suit fast mobile posts, Canva and Adobe Express suit template-driven branding, InShot and CapCut suit mobile video editing, and Photoshop, Premiere Pro, and Figma suit professional and team-based design. All of them can export at 1080 x 1920.
How Do You Export a Story Without Losing Quality?
Export at 1080 x 1920 in the right format, move the file to your phone without using a messaging app, and upload with Instagram’s high-quality upload setting turned on. Each of those steps protects the file from extra compression.
- Set the canvas. Start at 1080 x 1920 pixels, 9:16, in sRGB.
- Respect the guides. Keep text and logos 250 pixels from the top and bottom.
- Pick the format. Use PNG for sharp text and graphics, JPG for photographs, and MP4 with H.264 for video.
- Check the file size. Stay under 30 MB for images and 4 GB for videos.
- Transfer cleanly. Use AirDrop, a USB cable, or a cloud folder. Sending through WhatsApp or similar apps compresses the file before Instagram does.
- Turn on high-quality uploads. In Instagram’s settings under data usage, enable upload at highest quality.
- Preview before posting. Open the Story in edit mode and check that no sticker crosses the UI zones.
Skipping step five is the most common reason a sharp design looks soft on the phone. It’s an easy fix.
What Size Mistakes Hurt Story Performance Most?
The most damaging mistakes are uploading the wrong aspect ratio, placing text in the overlay zones, compressing the file twice, and cramming too much text into one frame. Most problems with Instagram Story Dimensions come from skipping the setup stage, not from the editing itself.
Here are the mistakes to check first:
- Uploading horizontal video. You get black bars or a heavy crop. Shoot vertical, or place the clip on a 9:16 canvas with a fill.
- Ignoring the safe zone. Your headline vanishes behind the profile bar, or the call to action hides under the reply field.
- Stretching a photo. It distorts faces and products. Crop or pad instead.
- Sending files through chat apps. This adds a compression pass before Instagram adds its own.
- Exporting too small. A 720-pixel-wide file looks fuzzy on a modern screen.
- Putting too much on one frame. A Story shows for five seconds. If it takes ten to read, nobody finishes it.
What do most of these have in common? They’re all fixable before you post. A two-minute setup check does more for quality than any filter.
Wrong aspect ratio, text inside the overlay zones, stretched images, and double compression cause most blurry or cropped Stories. All four can be avoided by starting at 1080 x 1920, keeping a 250-pixel margin, and transferring files without chat apps.
How Should Brands Design Stories for Reach and Engagement?
Brands should treat each Story frame as one idea: one headline, one visual, one action. Keep text short and large, place it inside the safe zone, and use interactive stickers such as polls and questions to prompt taps. Consistent colours and fonts across frames make a series recognisable.
Open the Stories of brands such as Nykaa, Swiggy, Zepto, or Mamaearth and you’ll notice a pattern: short text, one clear product or offer per frame, and a sticker or swipe prompt near the middle. The details change by campaign, so treat this as a pattern to watch for yourself, not a formula.
A few practical rules that hold across most accounts:
- Make text large enough to read on a small phone, roughly 40 pixels or more on a 1080-wide canvas.
- Use high contrast between text and background.
- Add captions to videos, since many people watch on mute.
- Lead with the strongest frame, because viewers decide fast whether to tap forward.
- Place stickers and link buttons inside the safe zone so they stay tappable.
This works best for product launches, offers, and quick explainers. Long, story-driven content may need a different format, such as a Reel or a carousel.
Conclusion
Three things matter more than the rest. Design at 1080 x 1920 pixels from the start, keep text and logos 250 pixels clear of the top and bottom, and export without letting a chat app compress the file. Do those three and your Stories will look sharper than most.
Tools are there to make that easier, not to replace the setup. Pick one that fits your workflow, build a reusable template with the guides already in place, and bookmark the table above whenever you need ig story dimensions fast. Then test a few Stories and check which frames people finish.
FAQ
What size should an Instagram Story be?
An Instagram Story should be 1080 x 1920 pixels with a 9:16 aspect ratio. That fills the full phone screen with no black bars or cropping. Images can be JPG or PNG up to 30 MB, and videos can be MP4 or MOV up to 4 GB.
What is the aspect ratio for Instagram Stories?
The aspect ratio is 9:16, which means a tall vertical frame. If your content has a different ratio, Instagram will crop it or add a background around it. Design at 9:16 from the start to keep control of how it looks.
Can I post a landscape or square photo to my Story?
Yes, but it won’t fill the screen. A square photo leaves about 840 empty pixels on a 1080 x 1920 canvas, and a landscape photo leaves even more. Crop it to 9:16, or place it on a branded background with a headline and caption around it.
Is the Story size different from Reels size?
The frame is the same: 1080 x 1920 pixels at 9:16. What changes is the interface. Reels need a deeper bottom margin, about 410 pixels, because of the caption and audio label. Stories usually need around 250 pixels.
How do I resize a photo for a Story?
Open Canva, Photoshop, Figma, or Adobe Express and create a 1080 x 1920 pixel canvas. Place your photo, crop or scale it to fill the frame, and add a background if there are gaps. Then export as JPG or PNG and upload from your phone’s gallery.
Why is my Instagram Story blurry?
Blurry Stories usually come from low resolution, double compression, or a wrong aspect ratio. Export at 1080 x 1920, avoid sending the through chat apps, and switch on upload at highest quality in Instagram’s settings. Also check that you’re not zooming a small photo to fill the screen.
How long can an Instagram Story video be?
Each Story clip can run up to 60 seconds. Longer videos are generally split into multiple 60-second Stories when you upload. Trim to the length you want first so the cuts don’t land mid-sentence.
Do I really need to worry about the safe zone?
Yes, if your Story has text, a logo, or a button. Instagram’s profile bar and reply field cover the top and bottom of the screen, and anything important placed there gets hidden. Pure photos and videos with no text are less affected.
Which tool is best for beginners?
Canva is the easiest starting point, because it opens a ready-made Story canvas and offers thousands of templates. For video, InShot or Instagram’s Edits app are simple to learn. If you want to design everything inside Instagram, the native editor works for quick posts.
Do Story ads use the same size?
Story ads use the same 1080 x 1920 pixel, 9:16 format. Meta’s Ads Manager includes a placement preview that shades the areas covered by Instagram’s interface, so you can check your creative before the ad runs. Keep text and logos well inside the uncovered area.


